Portillo's Famous Chopped Salad with Bacon and Pasta

by 👩‍🍳 Cooking With a Southern Vibe in Music City USA 👩‍🍳, February 28, 2022


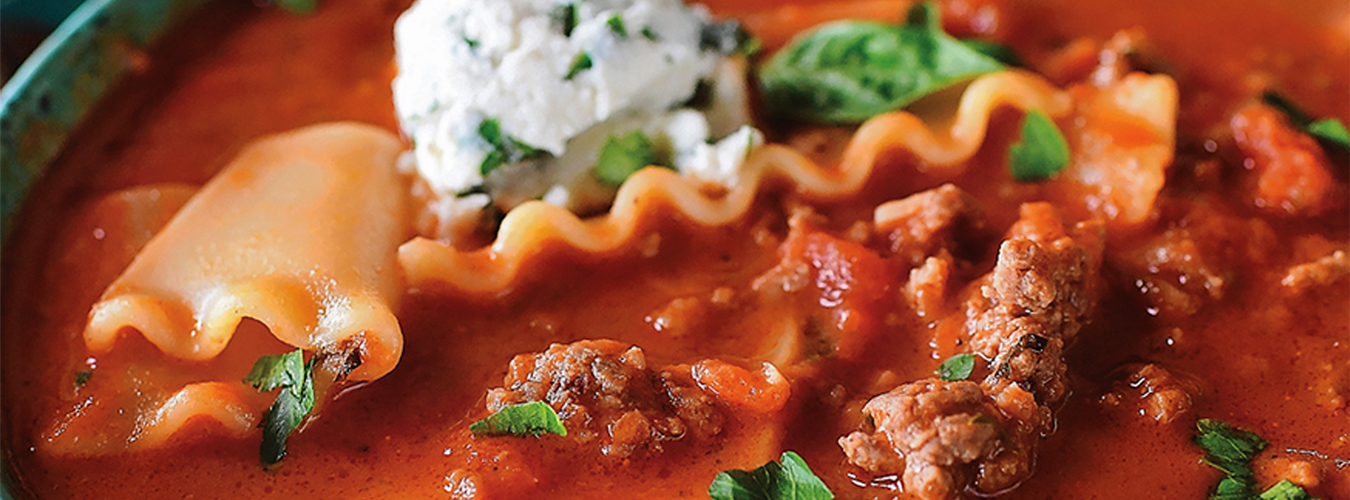
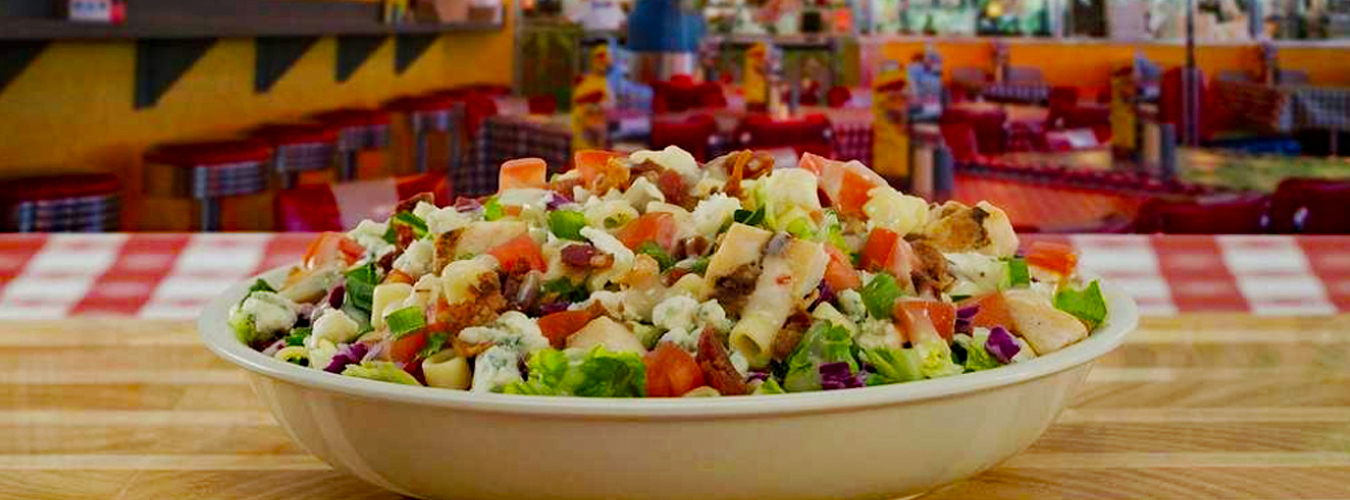
Oh, this is the stuff that Italian dreams are made of, Portillo's Chopped Salad, creamy dressing, lots of bacon, cheese, pasta, what's not to love...

It's Monday, I was going to post a healthy salad and then I thought, no, why would I do that when I can share this knockoff Portillo's Chopped Salad with all of you.  If you're not familiar with Portillo's, it's a famous Italian restaurant in Chicago who's humble beginnings go back to 1963 when it all started as a hot dog stand.

Over the years, Portillo’s has developed a huge fan base that includes many Hollywood actors, professional athletes, and politicians – you can see many of their pictures hanging on their restaurant walls. 

SWEET ITALIAN DRESSING:

1/3 cup white or regular balsamic vinegar
1/3 cup olive oil
2 cloves garlic, finely minced
2 teaspoons sugar, honey or maple
1/2 teaspoon dried oregano
1/4 teaspoon salt
1/4 teaspoon black pepper

SALAD:

8 ounces (about 1 cup or so) uncooked Ditalini pasta (see note)
5 cups chopped lettuce (use what you like: romaine, spring mix, iceberg or a combo)
1 cup chopped red cabbage (see note)
1 cup chopped tomatoes
3 green onions, chopped
1/2 - 1 cup cooked and crumbled bacon
1/4 - 1/2 cup crumbled Gorgonzola cheese
2 cups cooked, diced chicken (see note)

Steps

Combine all the dressing ingredients in a blender or jar. Process or shake until well-combined. Add additional salt and pepper to taste, if needed. You can make and refrigerate the dressing a week or two in advance.

Cook the pasta according to package directions in boiling, salted water. Drain and rinse quickly with cool water so it doesn't stick together while it cools. Pour a few tablespoons of the dressing over the pasta and stir lightly. Set aside to cool to room temperature (spreading it into a flatter layer - versus mounded in a bowl - will speed up the cooling process).

In a large bowl, toss together the lettuce, cabbage, tomatoes, and green onions. Add the cooled pasta, bacon, gorgonzola cheese, and chicken.

To serve, you can toss the salad with the dressing before serving - or, if you anticipate leftovers, add dressing only to the portions of salad served and then store the dressing and salad separately for fabulous leftovers.

Notes

Pasta: ditalini pasta is a tiny tube-shaped pasta. If you can't find it, you can easily substitute another small pasta shape. Even small elbow macaroni would work. You're looking for about 3 cups cooked pasta when it's all said and done. 

Lettuce: the lettuce is really customizable, the original Portillo's salad is a combination of iceberg, romaine and red cabbage. 

A rotisserie chicken works great here, as well as any other kind of leftover cooked/grilled chicken (the more flavorful, the better!). You could also leave the chicken out completely for a side dish salad.  

Vinegar: white balsamic vinegar works really well, but regular dark balsamic will work, too, just keep in mind that the darker dressing will add color to the salad.. I think you could easily use red or white wine vinegar, too. 

Leftovers: this salad makes the best leftovers. If you aren't going to eat the entire salad, just don't add the dressing until you serve it so it doesn't get soggy.
🍅
🍅
🍅

#salad #choppedsalad #jancooksrealfood #portillos #bacon #tomatoes #healthyeating #healthyfood 


The Original Pizza King Stromboli

by 👩‍🍳 Cooking With a Southern Vibe in Music City USA 👩‍🍳, February 27, 2022


What's better on a cold Sunday night than a Stromboli  and football.  Well, no football for me, but the rest of you, go ahead enjoy it.  I'll just be in the kitchen, eating my Stromboli, catching up on past episodes of my favorite soap, The Young and Restless...

The original Pizza King in Evansville, In is home to Stromboli's, and there are none better.  We lived there for years and ate them many, many times, but now that we live in Middle Tennessee, they aren't readily available, so the search was on to duplicate their recipe.  I searched online, made several variations and this one is the closest I can come to Pizza King's.


Ingredients

1 pound mild bulk sausage
1 pound hot Italian sausage (casing removed if using links)
1 large onion, diced
2 cloves garlic, minced
1 cup of your favorite marinara sauce (I use Trader Joe's tomato basil)
about 30 pepperonis chopped (stack and chop, makes it easier)
1 8 ounce block mozzarella cheese, grated
3 tsp crushed red pepper flakes - Pizza King Stroms always have heat, you choose the degree
6 deli type hoagie rolls 
olive oil
6 sheets of aluminum foil, about 12-14 inches long
baking sheet

Steps:

Brown the sausages and onions in a saute' pan.  Drain any fat from the pan.  Add the garlic and chopped pepperoni when the sausage is browned.   Add the marinara sauce and red pepper flakes.  Stir until thoroughly mixed and heated through.

Brush the top and bottom of a deli roll with some good olive oil.  Put the sliced deli roll in the middle of a piece of foil, fill with sausage mixture.  Put several heaping hands full of cheese on the sausage.  Bring the edges of the foil together and roll down to the sandwich and roll the ends up.

When all the rolls have been filled and wrapped, place them on a baking sheet and bake in a 350 degree  oven for about 20-30 minutes.  Remove from the oven and let cool for a few minutes.  Unwrap and enjoy.
🍕
🍕
🍕
#pizzaking #pizzakingstromboli #stromboli #italian #italiansandwich #evansville #evansvillein #midwestfood #sausage #italiansausage #cheese# #jancooksrealfood #cheesesteak #y&r #theyoungandtherestless


The BEST Chocolate Chip Banana Nut Bread you will ever eat....

by 👩‍🍳 Cooking With a Southern Vibe in Music City USA 👩‍🍳, February 26, 2022


Legend says that customers would fight over the last loaf of this bread. It was an over-the-counter item that was brought in warm and steamy, smelling like a chocolate fantasy. It freezes well and makes marvelous gifts when baked in smaller loaf pans. 

This recipe is from Elsah's Landing, a wonderful restaurant near St. Louis, that sadly, like so many family owned establishments, is long gone.  I ate there years ago and was so impressed I immediately bought all of their cookbooks and I've made, many, many wonderful dishes from them.  Their carrot cake has been a family favorite for years, but that's for another post.  

They now sell their cookbooks, used, on eBay, but ouch, they can be really pricey!

So, if you're looking for something a little different, the chocolate chips just take this banana bread to a new level.  Get out your bakeware, use those bananas on the counter that are overripe and whoever is lucky enough to eat this will thank you...

INGREDIENTS:

1 cup sugar
1 egg
1/2 cup butter
1 cup mashed ripe bananas
3 Tbsp milk
2 cups sifted flour
1 tsp baking powder
1/2 tsp baking soda
1 cup chocolate chips
1/2 cup finely chopped pecans, or more, you can never add too many pecans 

PREPARATION:

Preheat oven to 350 degrees. Cream sugar, egg and butter together in large mixer bowl. Beat until fluffy. Set aside.

Combine bananas and milk in small bowl. Set aside.

Sift flour, baking powder, and baking soda together in small bowl. Stir by hand into reserved creamed mixture alternately with reserved banana mixture until flour is just moistened.

Stir in chocolate chips and pecans. Grease 1 (9x5x3 inch) loaf pan. Turn batter into pan. Bake at 350 degrees for 1 hour, or until toothpick inserted in center comes out clean. Cool in pan for 10 minutes. Remove from pan. Cool on rack.

NOTES:

I tent my foil, be sure to poke holes in it, for the last fifteen minutes so that the top doesn't overbrown.

Sometimes I make these in mini-loaf pans.  They make great little joy gifts. 

I can't remember how long I bake these in mini loaf pans, so I went to Google, because Google always knows everything 😊

Baking in mini loaf pans is so much fun and so easy, too! The key is to adjust the bake time, reducing it by around 20-25%. Color and depth go into the final amount of time that should be reduced. Check your baking treats regularly for the best results


Mini Loaf Pans on Amazon


😋
😋
😋
#bananabread #chocolate #chocolatechip #yummy #food #jancooksrealfood #sundaybaking #bakingforfun #goodfood #sweettreats #fantasy #chocolatefantasy #stlouis 

A month of lemon EVERYTHING, coming March 1st

by 👩‍🍳 Cooking With a Southern Vibe in Music City USA 👩‍🍳, February 25, 2022


Spring is on the horizon, the birds are singing, the daffies are blooming here in Middle Tennessee and when I think of spring and food, I immediately think of... lemon!   I'll be posting a fresh, tart, puckery lemon recipe every day for the month of March, just because...

I went into my archives and found some of my best.   I have so many lemon recipes to share, really good recipes, because I, Jan, am a true lemonholic.  I just adore all things lemon.  A lot of the recipes this month will be desserts, but I will tuck in salads, drinks, maybe even a main dish or two, or three.

Subscribe in the sidebar so you don't miss any of these yummy recipes,  enjoy your daily dose of lusciousness, pucker up and Bon Appetit   ~ Jan

Hop on over to Instagram and follow me, all my recipes in a visual, easy to access format.  Here's the link... 

Trisha Yearwood's Famous Skillet Apple Pie with Cinnamon Whipped Cream

by 👩‍🍳 Cooking With a Southern Vibe in Music City USA 👩‍🍳, February 25, 2022


This is really decadent pie adapted from a recipe by Trisha Yearwood.  I saw her make this on Trisha's Southern Cooking years ago and knew I just had to make it.  Hubby would eat this every week, but we would have to roll us out of the kitchen in a wheelbarrow, so I save it and make it for special occasions.  I have to share the full picture of it, it's just so good, so rustic and I have to admit, I really love this picture, even if I did take it years ago.  I'm posting the original recipe which calls for sweetened whipped cream, but that's a pain in the patootie, a squirt of Reddi Whip or a dollop of Cool Whip sprinkled with cinnamon works for me.  

And even better, forget the whipped cream altogether and top this piece of lusciousness with a scoop of vanilla bean ice cream.   This is best served warm, but then we're a family who love warm pies.  


Ingredients

1/2 cup (1 stick) unsalted butter
1 cup light brown sugar
2 pie crusts, homemade is best, Trader Joes comes in a close second and Pillsbury is really available
One 21-ounce can apple pie filling, I'm a fan of Comstock, it has extra fruit.  
You can also make this with cherry pie filling, it's good, too and I always add a splash of almond flavoring to my cherry pie filling
2 tablespoons cinnamon sugar

Cinnamon Whipped Cream:

2 cups whipping cream, chilled
1 teaspoon ground cinnamon
4 tablespoons sugar


Directions

Preheat the oven to 400 degrees F.

When I first started making this pie, I made it in a pretty fluted pie pan, as shown above.  But now I've gone back to my roots and make it in a 9" cast iron skillet.  You just can't beat cast iron and Lodge makes wonderful, inexpensive ones.

Melt the butter in a 9-inch cast-iron skillet; set aside 1 tablespoon of the melted butter for the top crust. To the melted butter, add the brown sugar and melt them together on medium heat, about 2 minutes. Remove from the heat and line the skillet with one of the pie crusts. Pour the apple pie filling over the crust and sprinkle with 1 tablespoon of the cinnamon sugar. Use the second pie crust to cover the filling. Brush the top with the reserved melted butter, then evenly sprinkle the remaining 1 tablespoon cinnamon sugar on top. Cut vents in the middle of the pie. Bake for 30 minutes. Serve hot, topped with a generous dollop of cinnamon whipped cream.

Cinnamon whipped cream:

Chill a large metal mixing bowl and a wire beater attachment in the freezer for about 20 minutes. Pour the cream, cinnamon and sugar into the cold mixing bowl and beat until soft peaks form, 2 to 3 minutes; the mixture should hold its shape when dropped from a spoon. Don't overbeat or you'll have sweetened butter!


🥧
🥧
🥧

#applepie #pie #yummy #jancooksrealfood #missyearwood #trishassouthernkitchen #dessert #trishayearwood # #cherrypie #decadentdessert


Spicy Lasagna Soup, perfect for cold evenings...

by 👩‍🍳 Cooking With a Southern Vibe in Music City USA 👩‍🍳, February 24, 2022


I combined Half Baked Harvest's Lasagna soup with Carlsbad Cravings Lasagna Soup and came up with a wonderful variation.  Carlsbad Craving's recipe calls for you to break lasagna noodles in half and simmer  in the soup.  Well, have you ever tried breaking dry lasagna noodles?  All they do is fly all over the kitchen and break unevenly.  So then I found Half Baked Harvest's recipe and Tieghan called for cooking the lasagna noodles separately, then cutting them into manageable pieces because they are pliable after you cook them.  That made a lot more sense to me, and it was much easier.  Anyway, this is my variation of both of their recipes for an excellent cold winter evening soup, full of all the lasagna goodness we all love so much.

Ingredients

1 pound ground beef 
1 yellow onion, diced
4-5 garlic cloves, minced
1/2 teaspoon red pepper flakes
1 24 oz. jar Prego Traditional Italian Sauce or marinara sauce
6 cups chicken broth - I use a big tablespoon of Chicken Better than Bouillon instead of chicken broth
1 14 oz. can can crushed tomatoes
2 tablespoons tomato paste
2 teaspoons balsamic vinegar
2 teaspoons granulated sugar
1 tablespoon dried basil
1 tsp EACH dried parsley, dried oregano, salt
1/2 teaspoon pepper
1 whole bay leaf
8-10 oz. cooked lasagna noodles
1/2 cup heavy cream,optional**

CHEESE GARNISH:

shredded mozzarella cheese
freshly finely grated Parmesan cheese
ricotta cheese, whipped

Steps

Heat large Dutch oven/large soup pot over medium high heat. Add beef and onion and cook, stirring occasionally until beef is browned. Add garlic and red pepper flakes and saute for 30 seconds. Drain off any excess fat.

Add Prego Sauce, 6 cups chicken broth, crushed tomatoes, tomato paste, balsamic vinegar, sugar and spices. Bring to a boil then reduce to a simmer, stirring occasionally (approximately 20-30 minutes).

 Discard bay leaf and stir in cooked lasagna noodles and heavy cream (optional).  Garnish individual servings with desired amount of cheeses.

🍲
🍲
🍲

#lasagna #italian #yummy #jancooksrealfood #soup #italiansoup #lasagnasoup #lasagnalover #lasagnarecipe #comfortfood #homemadefood #halfbakedharvest 


Better Than Starbucks Iced Lemon Loaf, it's just the BEST!

by 👩‍🍳 Cooking With a Southern Vibe in Music City USA 👩‍🍳, February 24, 2022


You drive thru #Starbucks, buy a slice of their yummy lemon loaf for at least $3.50, knowing the next time they will have a price increase on your very favorite treat that you just are addicted to, then you buy a Venti Latte with a double shot of espresso, don't forget the tax and the tip, and oops, you've spent a chunka change.  Do that several times a month and it can be really painful.

But there is a better way.  Just make this at home and enjoy a slice every morning for days for a fraction of the price.  There are a lot of copycat Starbucks Lemon Loaf recipes floating around online, I've tried several that were just meh, and then I found this.  And yes, it's ahh-mazing. If you follow me, you know that I'm a huge lover of anything lemon, in fact so much so that next month I'm going to post a new lemon recipe for you every day for the entire month.

So get out your bakeware, grab your ingredients and stir up this yummy lemon bread, you don't even need a mixer.  This is very simple to make and you will love it!  You can even take a walk on the wild side and add some blueberries, but if you do, toss those blueberries in a bit of flour so that they don't all sink to the bottom.

INGREDIENTS:

3 large eggs
1 cup granulated sugar
1 cup (8 ounces) sour cream 
1/2 cup canola or vegetable oil, don't use olive oil for this, it needs to be vegetable oil
2 tablespoons lemon zest
1 to 2 tablespoons lemon extract, to taste (make sure you're using tablespoons not teaspoons)* and preferably use 2 tablespoons of this extract for maximum pucker power 
1 1/2 cups all-purpose flour
 2 teaspoons baking powder
1/2 teaspoon salt, or to taste

Lemon Glaze:

1 cup confectioners’ sugar
3 tablespoons lemon juice, or as necessary for consistency

INSTRUCTIONS:

Preheat oven to 350F. Spray a 9×5-inch loaf pan with  cooking spray, then make a parchment paper saddle and put in the pan so that you can lift the cooked loaf out easily.  Also spray the parchment paper with cooking spray.

In a large mixing bowl, add the eggs, sugar, sour cream, and whisk vigorously until smooth and combined.

Drizzle in the oil while whisking to combine.

Add the lemon zest, lemon extract, and whisk to combine. Note – I used 2 tablespoons of lemon extract because no actual lemon juice is used in the loaf and I found 2 tablespoons lemon extract necessary for full-bodied lemon flavor, don't wimp out on this, just do it!

Add the flour, baking powder, salt, and stir until just combined, don’t overmix. Some lumps will be present and that’s okay, don’t try to stir them smooth.

Turn the batter out into prepared pan, smoothing the top lightly with a spatula.

Bake for about 50 to 52 minutes, or until top is domed, set, and toothpick inserted in the center crack comes out clean or with a few moist crumbs but no batter. In the last 10 minutes of baking, tent pan with foil (loosely drape a sheet of foil over pan) to prevent excessive browning on the top and sides of bread before center cooks through.

Allow loaf to cool in pan on top of a wire rack for at least 30 minutes (I cooled 4 hours) before turning out onto rack to cool completely before glazing.

Lemon Glaze:

In a small bowl, add the confectioner’s sugar and slowly drizzle in the lemon juice while whisking until smooth and combined. You may need to play with the sugar and lemon juice amounts a bit as necessary for desired consistency and flavor.

Evenly drizzle glaze over bread before slicing and serving.

Extra glaze can be spread on the cut surface of the bread like you’d spread butter on toast and it soaks right in making the bread even moister and more lemony. Or you can halve the glaze recipe if you’re not a glaze person.

NOTES:

Bread will keep airtight at room temperature for up to 5 days or in the freezer for up to 6 months; I don’t recommend storing it in the fridge because it will dry out.

ONE OF MY FAVORITE KITCHEN GADGETS:

I've had a Butter Bell for years and sometimes I just assume that others have them as well.  I'm the kitchen gadget queen, and I try everything, but this is really a great way to keep soft butter on your counter at the ready.


This is the original Butter Bell, it's available in many colors and so worth the money, I have a red one, and I've  used it every day for years.

Butter Bell Link


🍋
🍋
🍋

Paula Deen's Famous Dill Tuna Salad...with a twist

by 👩‍🍳 Cooking With a Southern Vibe in Music City USA 👩‍🍳, February 23, 2022


I was watching Paula Deen live one day on Facebook and she had Michael in the kitchen making her dill tuna salad.  Talk about a duck out of water 😂  It looked so good, so I found the recipe and it was a must try for me.  It didn't disappoint, the infusion of dill was wonderful.

I did add a few ingredients to intensify the flavors, as I love dill in tuna, so here's the recipe, with my tweaks.

2 cans (6-ounces each) solid white tuna, packed in water, drained
2 hard-boiled eggs, peeled and finely chopped
⅓ cup mayonnaise
juice of ½ a lemon
lemon zest
1 tsp. dried dill weed
3 tablespoons thinly sliced chives (I substitute scallions when I don't have chives in the garden)
1 stalk celery, finely chopped
1 tablespoon dill pickle relish
1 tablespoon finely chopped red onion
Kosher salt
freshly ground black pepper
mixed salad greens, optional
toasted sourdough or whole-wheat bread (optional)

Steps:

In a mixing bowl, combine the tuna, eggs, mayonnaise, lemon juice, chives, celery, relish, and onion. Season the salad with a big pinch of salt and pepper and stir to combine. Serve on a bed of salad greens or on toasted bread, if you like. 

Healthy Options:

Low fat mayo is obvious choice but I''m a big fan of 20 calorie Miracle Whip Light - don't judge 😁 
Yogurt works,  but it's too sour for me.  Or you could just take a walk on the wild side and just mix it with yellow mustard.

Egg whites instead of whole eggs, or one egg yolk and two egg whites.  It's little things, but those darn calories add up really quickly 😖


I've had one of these handy tuna strainers for years.  I see so many people open a can of tuna, and drain it with the lid partially on, not a good idea, who knows what's on that lid.  With this, you just take the lid completely off and push to strain.  So easy.

Tuna Strainer


I've also had a vegetable chopper similar to this one, and it's one of my most used kitchen gadgets.  I use it multiple times weekly and I use it for my tuna salad because I never seem to have dill pickle relish.  I just substitute dill pickles using the smallest dice with this gadget and it works great.  I'm sure many of you have this, it's been around for years, just posting in case you don't.   I really like this one, it has more blades than mine, and then there's the color.  Love the color! 

Vegetable Chopper

🐟
🐟
🐟

#tuna #tunasalad #pauladeen #saladlover #whatsforlunch #jancooksrealfood #yummy #healthyfood #tunasandwich #pauladeen #pauladeensfamilykitchen #pioneerwoman


Pucker Up Sweet Cheeks, I've got a great lemon chicken recipe for you.

by 👩‍🍳 Cooking With a Southern Vibe in Music City USA 👩‍🍳, February 22, 2022


While y'all are out there posting #tacotuesday recipes, I'm over here drooling over my lemon chicken. I haven't made this in awhile, but I have the chicken thawing, the lemons are on the cutting board, and this #southerngirl is going to make this scrumptious easy dish for dinner tonight.  Did I mention that it was easy?  Just a couple of steps and you have dinner.  

I put mine in an iron skillet, brown one side, flip and immediately put in the oven to finish.  See what I mean, easy peasy.  Hubby likes this best with roasted potatoes, but yours truly loves it with pasta, any shape works for me,.  Hello, my name is Jan and I'm a pastaholic 😅

1 lb. chicken tenderloins
2 lemons
2 egg whites 
1/2 Cup flour
1 Tablespoon butter
1 Tablespoon olive oil
salt
lemon pepper seasoning

Preheat oven to 375 degrees

Put a mixture of butter and olive oil in oven proof skillet, slice a lemon, add it to the to butter mixture and heat.  

Meanwhile, pat chicken tenderloins dry with paper towel, season with salt and lemon pepper.  Dip in beaten egg whites, then put in large plastic zip lock bag, shake well and place in skillet with the bubbling butter, oil, lemon slice  mixture.  Brown well on one side, turn and immediately put in preheated oven to finish.  Don’t cover skillet.  Bake for 15-20 minutes until chicken is cooked, take out of oven and squeeze juice of the other  lemon over chicken and serve. 
🍋
🍋
🍋

#lemonchicken #chicken #dinnertonight #lemon #recipes #homecookedmeal #homecook #homecooked #homecooking #homechef #whatsfordinner #familydinner #familydinners #easydinner #easydinners #quickdinner #whatsfordinnertonight #mealplan #mealprepsunday #weeknightdinner #jancooksrealfood #yummy


SPAGHETTI WITH BROWNED BUTTER & MIZITHRA CHEESE

by 👩‍🍳 Cooking With a Southern Vibe in Music City USA 👩‍🍳, February 21, 2022


This is my favorite pasta dish of all time and I'm a pasta lover.  I first ate this at The Olde Spaghetti Factory years ago and have made it countless times since.  If you haven't eaten this, you're really missing a wonderful dish.  Don't let the picture of this simple dish fool you, this pasta is full of flavor, it's pungent, intense, delicious, comfort food, it's simply divine and it takes only minutes to make.  I've made
 this  for years and it never disappoints. If you've never had mizithra cheese, its readily available in your grocery store, I find it with the specialty cheeses.  

1 lb. spaghetti or your pasta of choice
1 cup browned butter
1 cup mizithra cheese

Brown butter by bringing butter to a boil in a saucepan, stirring constantly and watching so that it doesn't foam over the edge of the pan.  Once the foam starts to subside, continue boiling until it turns an amber color - 1 or 2 minutes should be long enough.  There will be sediment at the bottom of the pan, don't disturb the sediment, you don't want this in your finished browned butter.  Let the butter cool for a couple of minutes in the pan and strain, leaving sediment residue in the pan.

At this point it can be refrigerated to use later.

To make the dish, boil the pasta, divide into four serving bowls, top each serving with 1/4 cup of the cheese and spoon over 1/4 cup hot browned butter. 


These cute retro bowls are showing up everywhere.  How cute for pasta, cereal, ice cream. 

Here's the link...

🍝
🍝
🍝

#pasta #food #foodporn #italianfood #foodie #pizza #instafood #foodphotography #pastalover #foodblogger #dinner #foodlover #yummy #foodstagram #delicious #homemade #italy #lunch #spaghetti #instagood #italian #cucinaitaliana #restaurant #cooking #chef #love #italia #oldespaghettifactory #cheese #mizithracheese


Ina Garten's Famous Lemon Bars

by 👩‍🍳 Cooking With a Southern Vibe in Music City USA 👩‍🍳, February 20, 2022


Insanely good, decadently delicious, these are seriously the best lemon bars I’ve ever eaten. If I could give these bars twenty stars, I would! I've made these for my daughter-in-laws, who both love anything lemon, I've made them for girlfriends,I've made them for neighbors, we all moan with every bite. 

Not for the faint of heart, these lemon bars are intensey lemon flavored. They actually tasted like a lemon meringue pie without the meringue, they were so custardy inside.  Easy to make, too, my personal tweaks at the end of the recipe.  I will never look further than this for a lemon bar recipe, these are perfection. Thank you Ina Garten, what a National Treasure you are.

Ingredients

For the crust:

1/2 pound unsalted butter, at room temperature
1/2 cup granulated sugar
2 cups flour
1/8 teaspoon kosher salt

For the filling:

6 extra-large eggs at room temperature
3 cups granulated sugar
2 tablespoons grated lemon zest (4 to 6 lemons)
1 cup freshly squeezed lemon juice
1 cup
Confectioners' sugar, for dusting

Directions

Preheat the oven to 350 degrees F.

For the crust, cream the butter and sugar until light in the bowl of an electric mixer fitted with the paddle attachment. Combine the flour and salt and, with the mixer on low, add to the butter until just mixed. Dump the dough onto a well-floured board and gather into a ball. Flatten the dough with floured hands and press it into a 9 by 13 by 2-inch baking sheet, building up a 1/2-inch edge on all sides. Chill.

Bake the crust for 15 to 20 minutes, until very lightly browned. Let cool on a wire rack. Leave the oven on.

For the filling, whisk together the eggs, sugar, lemon zest, lemon juice, and flour. Pour over the crustand bake for 30 to 35 minutes, until the filling is set. Let cool to room temperature.

Cut into triangles and dust with confectioners' sugar.

And now for my tweaks:

I made a saddle of parchment paper (I sprayed the parchment with Pam just to be on the safe side) and put it in my 9x13 pan before patting in the crust. Putting a bit of additional flour on your hands really helps press them into the pan easily. I'm a big fan of using saddles, because you can just lift your bars right out of the pan to cut them. 


After I baked the lemon bars for the minimum time (just until they slightly jiggled but not brown, the tops were pale, with just a bit of browning around the edges) I put them in the refrigerator overnight. I didn’t cut them, I didn’t dust them with confectioner’s sugar, I just cooled them and put them in the fridge.

The next morning I lifted the edges of the parchment paper, they came out with just a little bit of a tug, I put them on a cutting board, and I put another cutting board on top and flipped them, then it was simple to peel off the parchment paper. It didn’t stick at all, thanks to the Pam. I then flipped them again so they were upright, cut them into large squares, took the cutting board, put it over the sink, used a strainer and dusted the squares heavily with confectioner’s sugar. I used a lot of powdered sugar.

I read all of Ina’s reviews before I made these, and decided to make her original recipe. There was a bit of confusion about the size of the pan, in the following video she says 9x12, but the website says 9x13, I used 9x13 and they were fine. But since I like all things thick, I might consider just the next size smaller pan the next time I make these.  But then again, these were pretty darned perfect...

A few of the reviewers complained that the filling tasted floury. I tasted one corner when they were warm, and I could detect a faint flour taste, but the secret lies with overnight chilling. This allows the flavors to marry, and trust me, you don’t taste flour, you taste lemon! Utterly delightful, yummy, fresh lemon. I think they are best cold, too. I learned from my elderly neighbor, who loves cold cake and bars, that things straight from the fridge do have a delightfully fresh, cool taste.

I’ve made lemon bars many times, but never with results like this. I think in the past I always dusted with the sugar too soon and it soaked into the bars, and I never refrigerated them. But, oh what a difference a day in the refrigerator makes...

You can dust leftover bars with more powdered sugar to freshen them.  Who doesn't like a lot of powdered sugar. 

Give these bars a try the next time you want a WOW Dessert! They won't disappoint...
🍋
🍋
🍋
#lemonbars #lemon #dessert #baking #lemonbar #homemade #desserts #lemons #food #sweets #lemoncake #cookies #brownies #foodphotography #lemonsultan #bakery #foodie #glutenfree #yummy #lemondessert #lemonade #homebaker #sweet #sweettooth #lemonsquares #cake #lemonwater #lemoncurd #yum


Joanna Gaines Magnolia Table Chicken Enchilada Casserole

by 👩‍🍳 Cooking With a Southern Vibe in Music City USA 👩‍🍳, February 19, 2022

This really is an absolutely delicious recipe, it's mellow, the flavors aren't overpowering at all, it's just warm, creamy, gooey perfection. 

She made this yummy recipe on Season 2, episode 4 of The Magnolia Table.  I watched that episode and knew I just had to make this and it did not disappoint.  It's such a nice change from cumin infused, adobo type sauces, it's like the Mexican version of Fettuccine Alfredo.  Well, okay, not really, but you get the idea...

Ingredients

Cooking spray

2 (10-ounce) cans mild green enchilada sauce
1 (10-ounce) can condensed cream of chicken soup
1 (8-ounce) container sour cream (1 cup)
4 cups shredded meat from 1 store-bought rotisserie chicken
1 (4-ounce) can diced green chiles
1 (14-ounce) bag grated mozzarella cheese (about 3 1/2 cups)
10 (8-inch) soft flour tortillas
1 tomato, chopped
½ cup chopped fresh cilantro 🤮
1 lime, cut into wedges

Cooked rice (preferably Mexican rice) and seasoned beans (preferably charro beans), warmed, for serving (optional)

Steps

Position an oven rack in the top third of the oven and heat the oven to 350 degrees. Coat a deep 9-by-13-inch baking dish with cooking spray.

In a large bowl, whisk together the enchilada sauce, condensed soup and sour cream. Spread 1/2 cup in the baking dish; set aside the remaining 3 1/2 cups creamy enchilada sauce.

In a medium bowl, combine the chicken and chiles (including any liquid from the can); set aside.

Sprinkle about 2 heaping tablespoons mozzarella on a tortilla, then add a heaping 1/3 cup of the shredded chicken and chiles. Tightly roll up the tortilla and place it seam side down in the prepared baking dish. Continue filling and rolling the remaining tortillas with 2 tablespoons mozzarella and a heaping 1/3 cup chicken mixture, placing the tortillas in the baking dish as they are filled, pushing the rolled tortillas as needed to fit in a single layer.

Pour the reserved creamy enchilada sauce over the filled tortillas. Bake for 20 minutes. Remove from the oven and sprinkle the remaining mozzarella on top. Bake until the cheese is melted, about 15 minutes. If you’d like it to be a bit browner in spots, you can pop it under the broiler for another minute or two.

Sprinkle enchiladas with tomato and cilantro and pass with lime wedges for squeezing on top. Serve enchiladas with rice and beans, if desired. Store leftovers in a covered container in the refrigerator for up to 4 days; reheat in a 300-degree oven.

🌮
🌮
🌮

#enchilada #jancooksrealfood #mexicanfood #enchiladas #food #burrito #mexican #foodie #dinner #foodporn #instafood #tacos #chimichanga #nachos  #lunch #texmex y #foodstagram #fajita #foodphotography #chicken #margaritas r #mexicancuisine #chickenenchilidas #joannagaines #magnoliatable

Vintage Taco Salad, sometimes you just don't mess with perfection...

by 👩‍🍳 Cooking With a Southern Vibe in Music City USA 👩‍🍳, February 18, 2022


Do y'all make Taco Salad, the one that's been around forever that's made with Doritos and Catalina Dressing?  If you haven't made it, You've probably had it at your mom's house or at a potluck or picnic. Maybe you've eaten it and forgotten just how good it is.   I've been making this salad since the 80's, and it's still one of my most requested recipes.  Hubby would happily eat this multiple times a week, he enjoys it that much. 

A lot of people add taco seasoned ground beef to their Taco Salad, we never do, but we do serve it with grilled burgers.  It's just soul soothing, yummy goodness, period!

This is so easy, it goes together in no time.  Here's how you do it.

1 can of light red kidney beans, rinsed and drained
1 chopped onion, green onion is awesome in this salad
iceberg lettuce, shredded
sliced cherry or grape tomatoes
Handfuls of grated cheddar cheese
Handfuls of Nacho Doritos that you crush lightly with your hands.
Catalina Dressing

Put everything in a large salad bowl, ending with the Doritos, toss at last minute with the chips and serve.

Now wasn't that easy?  It's not really a recipe, you just throw in what you like.  You can use any kind of  chip with this, Mexican corn chips, Fritos, etc. but the Doritos really are the best, because they have that great tangy, cheesy taste.

If you want to add seasoned and cooked ground beef, go for it and top it with a big dollop of sour cream.  You want corn in it?  That works, too.

So many possibilities with this, and you just can't go wrong, it's so good.

Note:  I put the beans in the fridge overnight, and then drain and rinse at the last minute so they are cold.

🍔
🍔
🍔

#tacotuesday #taco #tacosalad #salad #yummy #jancooksrealfood tacoseveryday  #tacolover #foodporn #foodie #tacosarelife #tacosfordays #mexicanfood # #tacotime #taconight #tacolife #tacotruck #tacoshop #yummy #tacolove #food #dinner #tacobar 


Charlie's Famous Margaritas

by 👩‍🍳 Cooking With a Southern Vibe in Music City USA 👩‍🍳, February 17, 2022


Everybody has a margarita recipe, but as you well know, some of them are just not all that. If you're looking for the knock your socks off, easiest to make, most refreshing homemade margarita you've ever tasted, this recipe is for you.

This is our friend Charlie’s recipe and it’s excellent!  The ladies love this!

1 can limeade concentrate - 12 oz.
3/4 can triple sec
3/4 can tequila
2 caps Roses Lime Juice

Add ingredients to your blender, fill with ice and blend to a slushy consistency.  Rim your glass with a squeeze of fresh lime, dip it in salt and you've got the best Margarita you've ever tasted.  How easy is that?

These Stemless Margarita Glasses are a best seller for a reason... they don't tip.  'Nuff said 😜


     You can check them out here


These are stemless wine glasses, even though you could use them for Margaritas.  I've had this set for years because I'm a big fan of green glass and the fact that they're embossed is even better.  I've also bought them for family, for friends, everybody loves these glasses.  

Why?  Because they're cute 😁 and they also happen to be the perfect size and they're easy to hold.

They're still available on Amazon, after all these years.  

🍸
🍸
🍸
#margaritas #tequila #tacos #mexicanfood #margarita #cocktails #happyhour #drinks #foodie #tacotuesday #food #beer #mexican #mexico #burritos #bar #comidamexicana #mexicanrestaurant #guacamole #nachos #cincodemayo #bartender #jancooksrealfood


Little Italy's Best, Maggianos’ Famous Baked Ziti Recipe

by 👩‍🍳 Cooking With a Southern Vibe in Music City USA 👩‍🍳, February 16, 2022


It doesn't get better than this, a famous recipe, from a famous restaurant and you can make this in your own kitchen.  It's straightforward, easily accessible ingredients, not hard to prepare and the result is ah-mazing..  It doesn't get better than this, pasta lovers...

Their story began in Chicago, Illinois in November of ’91 when Maggiano’s Little Italy opened the doors of its first location on the corners of Clark Street and Grand Avenue. The dishes were simple, authentic classics, many of them coaxed out of Italian grandmothers, mothers, and aunts whose ideas of a recipe were a pinch of this and a sprinkle of that. What happened next, as they say, is history.

The restaurant was successful from the very beginning. Eager diners sometimes waited hours to celebrate family-style over Italian–American cuisine, reminiscent of a Sunday night visit to their grandmother’s house -- or as they say in Italy, nonna’s casa! These delicious dishes paired with great service, generous portions and a warm atmosphere kept our guests and their families coming back for more.

Their Baked Ziti is the most requested of all their recipes.  And you can make this in your own kitchen.  I love doing this, but then I'm a cook.  I love the process from the prep to the finished product and for me, it's a joy, being in the kitchen and I hope that by sharing these wonderful recipes it will be a joy for you as well.  It's not that difficult to make a wonderful meal, just break it down into steps, turn on some amazing music and cook!

16 oz ziti pasta
20 oz canned or fresh marinara sauce - they prefer Rao's
2 oz olive oil
1 oz butter
1 lb ground Italian sausage
1 oz chopped basil
2 Tbsp minced garlic
8 oz shredded Mozzarella
1 cup white wine
3 Tbsp grated Parmesan
12 oz can of diced tomatoes
1 basil sprig

Steps

Place ziti Pasta in boiling water and cook as stated on the back of the packaging or until your desired al dente. Place the Olive Oil into a heated sauté pan over medium-high heat and cook the Italian sausage.

Once the sausage is almost cooked, add the garlic and continue cooking for approximately 30 seconds. Add the white wine and bring to a simmer, reducing the wine until almost completely dry.

Lower the heat to medium, and add the diced tomatoes, marinara sauce, butter and chopped basil. Remove from the heat, and add the pasta and half of the Mozzarella. Then toss to blend.

Transfer to the baking dish and top with the remaining Mozzarella and Parmesan cheese.

Place underneath a broiler or in a convection oven for approximately 2-3 minutes until cheese is bubbly and golden brown. Garnish with basil sprig and serve immediately.

If pretty Italian stoneware is your thing - here's a link to this two piece set.  And I'm the queen of justification, you can make this at home, buy this pretty stoneware set that you will use for years and it won't cost you as much as one meal in an Italian restaurant. 


👩‍🍳
👩‍🍳
👩‍🍳
#ziti #pasta #bakedziti #italianfood #zitilover #food #foodie #pastalover #zitipasta #dinner #homemade #foodlover #italian #foodphotography #genovese #comfortfood #delicious #napoli #mozzarella #cheese 


I make the BEST Gourmet Shop Oatmeal Cookies you ever put in your mouth, for real....

by 👩‍🍳 Cooking With a Southern Vibe in Music City USA 👩‍🍳, February 15, 2022


These aren't some little cute, fun little one bite cookies.  Nope, these are the real deal, the big fat chewy, decadent ones that you pay a fortune for in a gourmet cookie shop.   The kind of cookie that makes your eyes roll to the back of your head when you bite into one.  The kind of cookie that you promise yourself you will only eat half of, but you never do, you eat two or three because they're so delicious you can't stop yourself. They're plump, moist, chewy, cookies, filled with such yummy goodness that whoever is lucky enough to be in your kitchen when you pull these out of the oven will absolutely love.

While other people are over there going crazy over chocolate chip cookies, yours truly has never been that girl.  I'll take a great oatmeal cookie any day of the week over a chocolate chip. And yes, of course I have a killer recipe for chocolate chip cookies, but that's for another post.   

Finding the right balance of ingredients in a fat cookie that's moist, but never dry, is not an easy feat,  But never fear, look no longer, these are the most wonderful, most decadent morsels of mouth watering cookie goodness that you will ever put in your mouth. Pinky swear they are...

Ingredients

¾ cup unsalted butter, softened to room temperature
1 cup light brown sugar,
6 Tablespoons granulated sugar
2 eggs
1 Tablespoon vanilla extract
1 tablespoon molasses*
2 cups all-purpose flour
3 cups old fashioned oatmeal*
2 teaspoons ground cinnamon
1 teaspoon ground nutmeg, fresh grated is best
⅛ teaspoon ground cloves
1 teaspoon baking soda
1 teaspoon salt
1½ cups raisins**
2 cups boiling water

Optional:  1 cup walnuts or pecans.  Don't be stingy with the nuts, I always think nuts take cookies to a whole new level of deliciousness.

Steps

Preheat oven to 350* and line cookie sheets with a silicon mat or parchment paper, set aside

It's really important to plump the raisins by placing them in a small bowl and pour boiling water on top. Immediately cover with plastic wrap to keep in the heat and set aside while you assemble the cookie dough.  

In a mediums size bowl, mix together flour, oats, spices, baking soda, and salt, set aside

In the bowl of an electric mixer, cream together the butter and sugars until light and fluffy

Add in the vanilla extract and 1 egg at a time until fully combined with the mixer on medium-low

With the mixer on medium-low, slowly pour in the molasses until fully combined.

Scrape down the sides and prepare to add the dry ingredients

Add in the dry ingredients (the oat-flour mixture) in three separate additions, ensuring each is fully combined before adding the next

**Strain the raisins to remove the water and using the back of a wooden spoon, lightly press down on the raisins to squeeze out as much of the water as you can*** - I squeeze between paper towels to get every bit of moisture out.

Add the raisins and nuts to the cookie dough and gently combine with the mixer on low or by hand using a wooden spoon.

Using the big 2-ounce cookie/ice cream scoop, place mounds of cookie dough onto the prepared baking sheets, allowing about 2 inches between each dough placement

Pat each cookie lightly with your hands until it is flattened to a uniform thickness.  Don't smash these until they're thin, you want them fat and plump.

Bake the cookies in the preheated oven for 15-17 minutes until golden brown.  The thickness of the cookies determine how long to ake them, it may take more time than 17 minutes, just watch them and pull when you smell them and they are golden.  

Once baked, let the cookies cool for an additional 1-2 minutes on the tray before transferring to a wire rack to cool completely

Cookies will keep in an airtight container at room temperature for 1 week or frozen for up to 3 months

Notes

Be sure to use dark molasses but not blackstrap molasses. I prefer Grandma's molasses to cook with. 

*Always use Old Fashioned Quaker Oats, the kind that take five minutes to cook. Old Fashioned Quaker Oats are not the same as Quick Oats and they are not Steel Cut Oats. 
🍪
🍪
🍪
#oatmealraisincookie #cookies #oatmealcookies #oatmealraisin #cookieoftheday #quakeroats #sweetraes #sweetraesbakery #cookierecipe #oatmealcookie #bakedwithlove #sweetraesnj #baking #njcookies #njbaking #njbakery #familybakery #oatmealraisincookies #cookiemaking #bakedcookies #sugarfix #bakedgoods #funtimes #funfoods #yummy #sweettooth #bakery #bakerycookies #gourmetcookies


Angel Food Cake with a little sumpin-sumpin...

by 👩‍🍳 Cooking With a Southern Vibe in Music City USA 👩‍🍳, February 14, 2022


I have a love affair with angel food cake, it's light, airy and low in calories, well until you add the glaze, it is.  And I especially like it with pink frosting, the old recipe on the Domino Powdered Sugar Box, but that's not what I'm sharing today.  I'm sharing a lemon or lime glaze with all of you because spring is coming and this girl is a lemon/lime lover, so you will see a lot of citrus recipes showing up in the near future.

The original recipe called for actually making the cake from scratch.  Yikes, I'm not going to do that, it's time consuming, whipping all those egg whites, all that folding, and fingers crossed that it will actually rise to the top of the pan when you bake it.  Instead I buy  a Duncan Hines or Betty Crocker mix. Both of the mixes make an excellent cake, and they never deflate.

What I don't do is buy a bakery angel food cake, they're just not that good, and whipping up one at home from a mix makes me feel like I'm really "baking."   Just follow package directions and let cool completely upside down.

But back to the recipe for the sumpin-sumpin with this cake.  It's a lemon glaze, or if you prefer, a lime glaze.  Here's how you do it, simple, simple and oh so good...

Lemon or Lime Syrup and Lemon or Lime Glaze:

1/2 cup sugar
4 tablespoons fresh lemon or lime juice, reserving 1 tablespoon of juice
1/2 cup powdered sugar

Combine sugar and 3 tablespoons lemon or lime juice in small saucepan; stir over medium heat until sugar dissolves. Brush syrup all over top and sides of cake.

Then stir the 1/2 cup powdered sugar with remaining 1 tablespoon lemon or lime juice in small bowl until smooth. Drizzle glaze over top of cake. Let stand until glaze sets, about 10 minutes. DO AHEAD: Cake can be made up to 1 day ahead. Cover with cake dome and store at room temperature.

Transfer cake to platter; cut into wedges, and if you're into presentation, garnish with strawberries or raspberries and add a dollop of whipped cream.

🍋
🍋
🍋

#angelfoodcake #cake #angelfood #dessert #strawberry #food #baking #strawberries #glutenfree #bakery #instafood #sweet #cakesofinstagram #angelcake #delicious #fluffy #foodphotography #baker #feedfeed #chiffoncake #bakersofinstagram #foodporn #yummy #foodie #chiffon #lemon #lime

Lazy Lasagna, where have you been all my life...

by 👩‍🍳 Cooking With a Southern Vibe in Music City USA 👩‍🍳, February 13, 2022


Love lasagna but hate the process because it's so time consuming.  Lasagna can be really intense to make.

Oh, do I have a great workaround for you, the answer is ravioli, yes, ravioli.  This is so yummy, and so easy to make.  It only takes only a few minutes of prep and its ready for the oven.  And it's just delicious....

2-24 ounce jars of pasta sauce (two jars gives you a generous amount of sauce, you can reduce this to 1.5 jars if you think two jars is too much.  I made it the first time using one jar, and it wasn't enough.
1 25 ounce bag of frozen cheese ravioli

1 lb of ground beef
2 cups of shredded Italian style cheese
1 teaspoon of basil
1 teaspoon of oregano

Steps

Preheat oven to 400 degrees. Spray 9x13 pan. Brown ground beef in skillet and add 3/4th of the sauce to meat and let simmer for about 10 minutes.

Pour remaining sauce in the bottom of casserole dish. Next layer frozen ravioli, then a layer of meat sauce and top with 1/2 the cheese. Layer ravioli again, meat sauce and cheese. Sprinkle basil and oregano on top layer of cheese.

Cover with foil and bake for 30 minutes. Remove foil and bake for 15 more minutes. Let sit 5 minutes before serving

Options

You can make a white lasagna using two jars of Alfredo Sauce and a bag of wilted spinach
Saute onions, garlic and mushrooms with the ground beef for even more flavor
Substitute Italian sausage for ground beef, or mix half and half

Notes

The Italian style shredded cheese contains Mozzarella, Provolone, Parmesan, Romano, Fontina, and Asiago cheese. You can use whatever cheese you like. I also used the Classico tomato and basil pasta sauce 

I bought these lasagna pans as gifts for Christmas last year.  It's really versatile, maybe your kids only eat classic lasagna, you prefer a veggie version, hubby wants his with more meat, this is the answer...

I bought mine here


#pasta #food #ravioli #italian  #italianfood #foodie #pizza #instafood #homemade #beeflasagna #lasagne #foodphotography #foodstagram #cheese #foodlover #yummy #spaghetti #foodblogger #delicious #a #dinner #pastalover #lasagnalover


Let me convince you why you need a bread machine...

by 👩‍🍳 Cooking With a Southern Vibe in Music City USA 👩‍🍳, February 12, 2022


Hello, my name is Jan and I'm a breadaholic, so of course I think everybody should be able to make a perfect loaf of bread with a minimal amount of effort.  My dream job is to work in a bread factory, and no, I'm not kidding, I would work there for free, okay, maybe not for free, but maybe minimum wage with benefits and with access to all the warm bread I want to eat  I would even bring my own butter, just to be in that environment and smell that bubbling, breathing yeast.  I know, I know, it's a dream, but I have many times driven by Lewis Bread Company when they were baking bread in the factory and pulled over just to sit there with my windows rolled down, looking like a complete dork, inhaling that wonderful smell. See what I mean, I really am a breadaholic.

 And while there is nothing better than the smell of homemade bread, there is nothing more time consuming than making a loaf from scratch, and then there is always the possibility that it may not rise.  Been there, done that, so many times.  It's so beyond frustrating when bread doesn't rise or when it overcooks and burns.  I remember back, way, way back, to when hubby and I were first married. I wanted to make homemade bread so badly, I would painstakingly knead that dough for exactly eight minutes, cover it, sit in on the counter and it wouldn't rise.  I would just sit and cry, I really would, which of course did no good, but then I would dry my eyes and try again another day.  These were the days before the Internet, there was nobody to ask questions, but finally I did figure out, somehow, to put the bread in a warm oven and it would help the rise.  But being the ditz that I've always been, more times than I care to remember, I would forget to turn the oven off and then the bread would start cooking and it would be ruined.  Oh, so many disasters, oh the stories I could tell.

And then, finally, finally, I bought a bread machine, specifically the Zojirushi Bread Machine and it was a total game changer, no more ruined bread, it did the work, kneaded the dough,  baked the bread and it never failed, ever. My first Zo made a 2 lb. loaf and now, since it's just me and hubby, I have the mini Zo, which makes a 1 lb. loaf and it's the one we use all the time, it's perfect for two people.

Bread machines fell out of favor a few years ago, so many of us jumped on the low carb bandwagon and we abandoned bread in all forms.  Then came the Pandemic, people were home, they rediscovered the joys of baking bread, and they also rediscovered how difficult it can be to turn out the perfect loaf.  But not with the Zo, it's just the perfect bread machine.  It's not the cheapest, nor the most expensive, but if you are a regular reader of my blogs, you know my motto is pay good money for quality appliances and they will last you for years.  You put in the ingredients and in three hours, forty minutes you have bread.  You can also program it to delay the start so that if you're away from home you can come back to hot bread at your specified time.

Here' the machine we use now to make a 1 lb. loaf and the finished bread 


It's the Mini Zojirushi, sold here on Amazon

If you want a bigger machine, which is what first purchased and still use when family or friends come to dinner, then this is a great option.


It's the Zojirushi Virtuoso Plus, also sold here on Amazon

Here is the slicer I purchased last fall along with the mini Zo for our son's birthday.  The mini is the perfect size for his family of three and this is a great slicer.


It's made of bamboo, comes with a knife and folds to store.


I have a lot of bread recipes for healthy options, whole wheat, grains, Artisan breads, even some copycat recipes from Great Harvest Bread Company which I will be happy to share, if anyone is interested, just leave a message in the comments.  But sometimes you don't want healthy options or Artisan bread, sometimes you just want old fashioned white bread, reminiscent of what Grandma used to make, and if you do, this recipe is the one you want!

And if you don't have or want a bread machine, even though I can't understand why anybody wouldn't, go for it, make this and knead it by hand, proving to yourself that you are a true bread maker and that you don't need a pricey machine, it's much more rewarding to do it by hand.    

So go ahead,  whip up a loaf, and good luck with that 😉 Okay, so I'm kidding, ignore me, I'm just jealous of the bakers that put forth that much effort.  I'm all about making cooking as easy as possible in my old(er) age.

This is for a two pound loaf, if you have a mini Zo, just halve the recipe, easy peasy...

Hubby's Fave Buttermilk Bread

Ingredients:

1 ½ cups buttermilk, but if you don't have buttermilk, regular milk works fine
4 cups bread flour
1 ¼ teaspoon salt
4 Tablespoons sugar
1 ½ Tablespoons oil optional
1 ¾ teaspoons active dry yeast

Instructions

Use the basic setting with medium crust.

Follow the instructions that came with your bread machine in terms of which ingredients to put in the bread machine first.  

Notes

This is a recipe for a two-pound machine. You’ll be using the basic or white cycle with medium crust.
If time is short, you can make this recipe with the quick cycle of your bread machine substitute the active dry yeast with three teaspoons of fast-rising (rapid rise) yeast.

Don’t have buttermilk, but want that tangy taste? To make sour milk add one tablespoon of vinegar to one cup of room-temperature milk. (Adjust amounts as needed for each recipe.) Stir and wait about 5 minutes.


#zojirushi #minizo #minizojirushi #zojirushivirtuoso #homemadebread #bread #homemade #sourdough #breadmaking #sourdoughbread #baking #artisanbread #food #breadbaking #foodporn #realbread #instafood #foodie #homebaking #homemadefood #breadlover #foodphotography #homebaker #bakery #levain #wildyeast #sourdoughbaking #instabread #yummy #sourdoughstarter #breakfast #bakingbread #foodstagram #


Cook like the pros, Ina, America's Test Kitchen, they all use these...

by 👩‍🍳 Cooking With a Southern Vibe in Music City USA 👩‍🍳, February 11, 2022

Barefoot Contessa, America's Test Kitchen, Cooks Country, Giada, Rachael Ray, Paula Deen,  these are just a few of my favorites who use these stack prep bowls.  And since I'm a devoted follower of cooking shows, the search was on.  I found them on Amazon, I pretty much find everything on Amazon.  That little Prime truck comes wheeling in my drive many times a week and it's just like I'm getting presents, well until the credit card bill comes, anyway. 😳

But why did I need these?  It's because  the one thing that these shows have in common, they use these very same set of ten bowls to measure ingredients ahead of time so when it's time to cook they can just dump, mix and go.  This has been eye opening for me, a total game changer that makes the prep process run so much smoother.  Having everything measured and assembled just works.  Organization is a wonderful thing, it really is.  And besides, at my age, I sometimes forget to add ingredients.  Oh let's face it, it has nothing to do with my age, I've always forgotten to add ingredients, and trust me, it's made for some very interesting dishes over the years.   But when everything is pre-measured and ingredients are checked and rechecked, it's a win-win situation.

But back to my story, after watching these shows and seeing so many people using glass prep bowls, of course I wanted them, too.  I am a pretend chef, after all 😉 Okay, so I'm just a cook, but a girl's gotta dream.  And yes, you can use any bowls out of your cabinet, but these just look so... professional!  So, anyway,  I purchased them last year. I get so excited about anything cooking related and this just makes the process fun. I know, I'm a total geek, but it really does take everything to a new level.  I paid over $40 for this set last year, and the prices have tanked, they're just $23.49 now, Prime, free ship.  It's a good deal...

Here's the link....


#americastestkitchen #foodtv #cooksillustrated #cookscountry #kitchenprep #pioneerwoman #barefootcontessa #bobbyflay #kitchen #cooking cookingclasses #cookinglover #cookinglight #cookinggram  #cookinglesson #cookingforhusband #cookingismypassion

© Jan CAN Cook · THEME BY WATDESIGNEXPRESS