Black Forest Muffin Cakes

by 👩‍🍳 Cooking With a Southern Vibe in Music City USA 👩‍🍳, March 30, 2009
Black Forest Muffin Cakes

1    box (1 lb 2.25 oz) Betty Crocker® double chocolate muffin mix
1    can (21 oz) cherry pie filling
1    egg
    Frozen (thawed) whipped topping, if desired
12    maraschino cherries, if desired
1.    Heat oven to 400°F. Place paper baking cup in each of 12 regular-size muffin cups.
2.    In medium bowl, stir muffin mix, pie filling and egg until blended (batter will be very moist). Divide batter among muffin cups.
3.    Bake 28 to 30 minutes or until tops spring back when touched. Cool 5 minutes; carefully remove from pan to cooling rack. Cool completely, about 30 minutes. Serve each cake topped with dollop of whipped topping and a cherry.
High Altitude (3500-6500 ft): Place paper baking cup in each of 18 regular-size muffin cups. Stir 2 tablespoons Gold Medal® all-purpose flour into dry muffin mix.
Make the Most of This Recipe
Did You Know?
Black Forest is the area in Germany where chocolate cake and cherries were first combined in the classic Black Forest dessert.
Nutrition Information:
1 Serving: Calories 250 (Calories from Fat 70); Total Fat 8g (Saturated Fat 3g, Trans Fat 1g); Cholesterol 20mg; Sodium 220mg; Total Carbohydrate 43g (Dietary Fiber 0g, Sugars 32g); Protein 3g Percent Daily Value*: Vitamin A 0%; Vitamin C 0%; Calcium 20%; Iron 10% Exchanges: 1/2 Starch; 2 1/2 Other Carbohydrate; 0 Vegetable; 1 1/2 Fat Carbohydrate Choices: 3
*Percent Daily Values are based on a 2,000 calorie diet.

Source:  Betty Crocker

Sauteed Chicken with Mushroom Sauce….

by 👩‍🍳 Cooking With a Southern Vibe in Music City USA 👩‍🍳, March 30, 2009

I’ve had really good luck with Pampered Chef recipes. Doesn’t take a rocket scientiest to figure out that  they would use really good recipes to promote their product.   This recipe looks good, but I can’t keep from thinking that this saute pan is way too small to cook those mushrooms in.  I would have then all over the stove…

~ jan

It’s a quick little video, easy recipe, but it looks pretty good… 

Coconut Cream Tarts with Macadamia Nut Crusts

by 👩‍🍳 Cooking With a Southern Vibe in Music City USA 👩‍🍳, March 29, 2009

Coconut Cream Tarts with Macadamia Nut Crusts

Ingredients

  • 1/3  cup  all-purpose flour
  • 3/4  cup  sugar
  • 4  large eggs
  • 2  cups  milk
  • 1  tablespoon  vanilla extract
  • 1 1/2  cups  flaked coconut, divided
  • 2 1/2  cups  all-purpose flour
  • 3/4  cup  cold butter or margarine, cut up
  • 2  tablespoons  water
  • 1 1/2  cups  macadamia nuts, chopped
  • 1  cup  whipping cream
  • 3  tablespoons  sugar

Preparation

Stir together 1/3 cup flour and 3/4 cup sugar; whisk in eggs.

Cook milk in a heavy saucepan over medium heat until hot. Gradually whisk about one-fourth of hot milk into egg mixture; add to remaining hot milk, whisking constantly.

Cook over medium-high heat, whisking constantly, 5 to 6 minutes or until thickened. Remove from heat; stir in vanilla and 1 cup coconut. Cover and chill 3 hours.

Bake remaining 1/2 cup coconut in a shallow pan at 350°, stirring occasionally, 5 to 6 minutes or until toasted; set aside.

Pulse 2 1/2 cups flour and butter in a food processor until crumbly. Add 2 tablespoons water, and pulse 30 seconds or until dough forms a ball. Turn out onto a lightly floured surface; knead in nuts.

Divide dough into 12 equal portions; press each portion into a(3- to 4-inch) tart pan. Prick bottoms with a fork, and place on a 15- x 10-inch jellyroll pan. Cover and freeze 30 minutes.

Bake on jellyroll pan at 375° for 15 to 20 minutes or until golden. Cool in tart pans 5 minutes; remove from pans, and cool completely on a wire rack.

Spoon coconut custard mixture into tart shells.

Beat whipping cream and 3 tablespoons sugar at high speed with an electric mixer until soft peaks form; dollop or pipe onto tarts. Sprinkle with toasted coconut; chill.

Southern Living, DECEMBER 1997

Strawberry Basket Cake from Southern Living

by 👩‍🍳 Cooking With a Southern Vibe in Music City USA 👩‍🍳, March 29, 2009

Oh, wouldn’t this be special on an old cake stand.  I wonder if it’s difficult to basket weave the frosting?

Chocolate-Strawberry Basket Cake from Southern Living

Ingredients

  • 1/2  cup  butter or margarine, softened
  • 1  cup  sugar
  • 1  cup  firmly packed light brown sugar
  • 2  large eggs
  • 2  teaspoons  instant coffee granules
  • 1  cup  boiling water
  • 1 1/2  cups  all-purpose flour
  • 3/4  cup  cocoa
  • 2  teaspoons  baking soda
  • 1  teaspoon  baking powder
  • 1/2  teaspoon  salt
  • 1  cup  sour cream
  • 1  teaspoon  vanilla extract
  • Chocolate Buttercream Frosting
  • Florist wire
  • Assorted fresh flowers and foliage
  • Florist tape
  • Florist water picks
  • Chocolate-Dipped Strawberries
  • Garnish: Marzipan Bees

Preparation

Beat butter at medium speed with an electric mixer until fluffy; gradually add sugars, beating well. Add eggs, 1 at a time, beating until blended after each addition. Set mixture aside.

Stir together instant coffee granules and 1 cup boiling water until granules dissolve.

Stir together flour and next 4 ingredients. Add to butter mixture alternately with sour cream, beginning and ending with flour mixture. Beat at low speed until blended after each addition. Gradually add coffee mixture and vanilla, beating at low speed just until blended. Pour batter into 2 greased and floured 8-inch square cakepans.

Bake at 350° for 30 minutes or until a wooden pick inserted in center comes out clean. Cool in pans on wire racks 10 minutes; remove from pans, and cool on wire racks.

Spread a thin layer of Chocolate Buttercream Frosting between layers and on top and sides of cake, reserving remaining frosting.

Fit a decorating bag with basket-weave tip, and fill with some of remaining frosting. Pipe basket-weave pattern around sides, refilling bag as needed. Change to star tip, and pipe ruffle around top and bottom of cake.

Form handle from florist wire; attach foliage and flowers with florist tape.

Insert 2 water picks into top of cake near 2 opposite edges, and insert wire ends of handle into water picks. Mound Chocolate-Dipped Strawberries onto top of cake.

Garnish with Marzipan Bees, if desired.

NOTE: For foliage, we used strawberry plants. Roses, pansies, and violas may also be used.

Southern Living, APRIL 1998

Oven Fried Chicken

by 👩‍🍳 Cooking With a Southern Vibe in Music City USA 👩‍🍳, March 28, 2009
Oven-Fried Chicken

Yield

4 servings (serving size: 1 chicken breast half or 1 drumstick and 1 thigh)

Ingredients

  • 1  cup  low-fat buttermilk
  • 2  large egg whites, beaten
  • 1  cup  all-purpose flour (about 4 1/2 ounces)
  • 1/3  cup  cornmeal
  • 1  teaspoon  salt, divided
  • 3/4  teaspoon  freshly ground black pepper
  • 1/4  teaspoon  ground red pepper
  • 2  chicken breast halves, skinned (about 1 pound)
  • 2  chicken thighs, skinned (about 1/2 pound)
  • 2  chicken drumsticks, skinned (about 1/2 pound)
  • 2  tablespoons  canola oil
  • Cooking spray

Preparation

Preheat oven to 425°.

Cover a large baking sheet with parchment paper. Combine buttermilk and egg whites in a shallow dish; stir well with a whisk. Combine flour, cornmeal, 1/2 teaspoon salt, black pepper, and red pepper in a separate shallow dish; stir well. Sprinkle chicken evenly with remaining 1/2 teaspoon salt. Dip chicken in buttermilk mixture; dredge in flour mixture.

Heat oil in a large nonstick skillet over medium-high heat. Add chicken to pan; cook 4 minutes on each side or until lightly browned. Place chicken on prepared baking sheet; lightly coat chicken with cooking spray. Bake at 425° for 30 minutes or until chicken is done.

Source:  Cooking Light

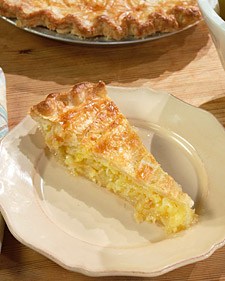
Lemon Shaker Pie

by 👩‍🍳 Cooking With a Southern Vibe in Music City USA 👩‍🍳, March 28, 2009
Featured Recipe

Ingredients

Makes one 11-inch pie

Directions

  1. Wash and cut 2 of the lemons into paper-thin slices. It is very important to slice the lemons as thinly as possible; use a very sharp knife or an electric meat slicer, if on is available. Remove peel and pith of remaining lemons; slice the flesh very, very thinly, and put it with the other slices in a large mixing bowl. Add sugar, and toss well to coat. Cover bowl with plastic wrap, and let the mixture rest overnight, stirring occasionally.
  2. The next day, preheat oven to 450 degrees. Press one circle of pastry into an 11-inch pie plate and chill.
  3. Add beaten eggs to the lemon mixture, and mix well. Turn mixture into prepared pie shell, neatly arranging some of the lemon slices on top. Cut long, even slashes 1 inch apart in the other pastry round, and place on top of filling. Crimp edges of the pie to seal. Brush top and edges with egg-white glaze. Bake for 15 minutes. Reduce oven temperature to 375 degrees and continue baking for 30 minutes, or until the crust is golden brown and shiny. Let cool on a rack before serving.

Source:  Martha Stewart Living

Key Lime Coconut Angel Cake

by 👩‍🍳 Cooking With a Southern Vibe in Music City USA 👩‍🍳, March 20, 2009
Key Lime Coconut Angel Cake

1 box Betty Crocker® white angel food cake mix
1 1/4 cups cold water
1 can (14 oz) sweetened condensed milk
1/3 cup Key lime or regular lime juice
1 teaspoon grated lime peel
1 container (12 oz) frozen whipped topping, thawed
1 cup flaked coconut
Sliced kiwifruit and strawberries, if desired
Print these coupons...
1. Make cake mix as directed on package, using cold water. Cool cake completely. Cut cake horizontally into 3 layers. Place bottom layer, cut side up, on serving plate.
2. In large bowl, beat milk, lime juice and lime peel with wire whisk until smooth and thickened. Fold in whipped topping.
3. Spread 1 cup lime mixture evenly over top of first layer of cake. Place second layer of cake carefully on bottom layer; spread evenly with 1 cup lime mixture. Top with remaining layer of cake.
4. Frost top and side of cake with remaining lime mixture. Sprinkle with coconut. Garnish cake with kiwifruit and strawberries.

Source: Betty Crocker

The BEST french bread, EVER!!!

by 👩‍🍳 Cooking With a Southern Vibe in Music City USA 👩‍🍳, March 12, 2009

ab

I was a huge fan of Abby Mandel in the 80’s.  I bought all of her cookbooks, poured over all of her recipes again and again, and never made anything of hers that wasn’t totally awesome.

I had just gotten my Cuisinart, which I thought, and stlll think, is the greatest workhorse in the kitchen,and was always looking for new ways to use it.  Hubby bought me the largest size Cuisinart made, oh what an extravagance it was... 

The year was 1978, I was a young mother, twenty-eight years old, with two sweet little boys and I loved to cook for my family. We were on a Christmas shopping trip to Cincinnati with Charlie and Nisha, and  I was so thrilled when he bought it for me, so excited that I still remember it vividly to this very day!  I can’t remember exactly how much he paid for it, but it was expensive, I’m thinking around two hundred twenty-five dollars,  so it was quite a major purchase for us. I still have it, sitting proudly in my kitchen, front row center, and I use it all the time 

Oh my, it’s over thirty years old now, much loved, and still runs like a champ.  LC has asked me repeatedly if I wouldn’t like a new one, no way, I ADORE my old Cuisinart, and if it ever quits working, I’ll just have it repaired.  I have wonderful, wonderful memories using it, no way would i ever replace it.

This recipe for french bread is from my favorite of all her books, Abby Mandel’s Cuisinart Classroom. It became an instant hit in our family and I’ve made it again and again. The boys make it also, in fact, John made it just a few weeks ago.  I’m showing the recipe as she published it, but the Notes show the changes I made to it.  It’s a wonderful bread, especially if you braid it.  Veronica’s family loves it, also, V has learned to make a great looking braid from her dough over the years.

If this book intrigues you also, you can usually find it for sale on eBay.

Basic French Bread, Abby Mandel's Cuisinart Classroom, 1980

GLAZE:

1 large egg
1/2 tsp. salt
Process with metal blade and salt for 2 seconds, reserve.  Do not clean work bowl.

Note:  I only use egg whites, I think using a whole egg gives it too much of an eggy taste.

BREAD:

1 package yeast
1 teaspoon sugar, optional (I add 2 tablespoons additional sugar, because we like it sweet)
1 cup plus 2 tablespoons warm water
2 cups bread flour
1 cup plus 2 tablespoons all-purpose flour
1 cup all purpose flour )

NOTE: I use 3 cups bread flour, no all-purpose

-----------------------------

Stir the yeast and sugar into the water in a small bowl and let the mixture stand for 10 minutes or until foamy.  If you omit the sugar, the mixture will not foam.

Metal Blade: Put the flours and salt in the work bowl and turn on the machine.  With the machine running, add the yeast mixture through the feed tube.  Process it for 40 seconds or until the dough is uniformly moist and elastic.  If it is too wet, add flour, 1 teaspoon at a time, processing after each addition until the dough is of the proper consistency.  Transfer the dough to an oiled bowl and rotate it to coat the surface with the oil.

Preheat oven to the lowest temperature for 2 minutes and turn it off.  Cover the bowl with a damp towel and put it in the oven, cushioning the bottom with a potholder.  Let the dough rise for 1 hour or until it has doubled in bulk.

Put the dough on a heavily floured board and work in enough flour so that it is easy to handle and no longer sticky.  Divide it in half and roll one half into a rectangle.  Starting at the short side, roll up the rectangle into an oblong loaf.  Pinch the ends and seam tightly, Put the dough seam side down into an oiled double French bread pan sprinkled with cornmeal.  Roll and shape the remaining dough in the same manner.  Cover loaves with a damp towel and let them rise again, for 45 minutes or until almost doubled, following the instructions for the first rising.  Remove pan from oven.

Adjust the oven rack to the middle level and preheat oven to 425 degrees.

Make several slashes in the tops of the loaves, brush them with the reserved glaze, taking care not to drip the glaze on the pan.  Bake the loaves for 28 minutes or until they are deeply colored and sound hollow when rapped on the bottom.  Remove the loaves from the pan and le them cool on a wire rack.  Makes 2 french loaves.

For bread that stays fresher longer and has a softer texture, decrease water by 2 tablespoons and add 2 tablespoons of butter to the dough after you add the yeast mixture.  Knead dough as directed.

For sesame seed bread, add 1/4 cup sesame seeds to the flour

For herb bread, mince 2 tablespoons of parsley, 1 teaspoon of snipped chives, 1 large scallion, and 2 teaspoons of dried dillweed.  Add them to the flour and reduce the liquid by 1 tablespoon.

For wheat germ bread, add 1/4 cup wheat germ to the flour.

For cheese bread, use 2 ounces of chilled cheddar, swiss or mozzarella cheese or 2 ounces of parmesan cheese at room temperature  Shred it with the shredding disc using light pressure and add to the flour.

NOTE: I bake at 375 degrees for 10 minutes, then add glaze, and bake another 10-15 minutes.  I think the 425 oven is too hot.  To make braid, divide dough into 3 pieces, roll into 3 logs, starting to braid in the middle of the loaf, not at the edge, start in middle, braid to one end and tuck end under, sealing with a bit of water, then go back and do the same with the other side.

If you are using 2 french bread pans to make 2 loaves, it needs to be a baguette size, if you have a regular french bread pan, I just make it into one loaf.

I also never use a whole egg, , I just whip an egg white and brush the bread with it, then sprinkle it with sesame or poppy seeds.

This is a wonderful recipe, it sounds a bit complicated, but it isn’t.  It’s well worth the 3 hours you spend to make it.  I usually add the butter to it, as we like it soft.

If you want it really crispy, just omit the butter, and toss a few ice cubes on your oven floor periodically as it bakes. The ice will melt, create steam and help to crisp the bread.

~ jan

Perfect scrambled eggs, the Julia Child way…

by 👩‍🍳 Cooking With a Southern Vibe in Music City USA 👩‍🍳, March 09, 2009

Scrambled Eggs

2 eggs

1 pat of butter

1 Tbsp (or thereabouts) of whole milk or cream

Salt and pepper to taste

  1. Heat a medium pan (preferably nonstick) over medium-low heat.
  2. In a separate bowl, scramble your eggs enough to break the yolks and mix the whites in, but not enough to make the mixture frothy. In other words, don’t over mix.
  3. When the pan is heated, reduce the heat to low and add the butter. Once the butter melts along the bottom of the pan, add your eggs and let them sit for a bit in the butter. Don’t stir too quickly. You want the heat to permeate the bottom of the eggs and start to cook them.
  4. When you can see that the bottom of the eggs have begun to heat through, stir the eggs and then add the cream or milk, which will instantly froth a bit. Mix the milk or cream into so it integrates into the eggs and makes them custardy.
  5. Continue cooking on low heat until the eggs are slightly firm (but not so long that they are actually firm).
  6. Remove from the pan and serve immediately with salt and pepper to taste.  Add an extra pat of butter if you want to really indulge.
© Jan CAN Cook · THEME BY WATDESIGNEXPRESS