Slow Cooker Refried Bean Chili

by 👩‍🍳 Cooking With a Southern Vibe in Music City USA 👩‍🍳, February 06, 2012

chili

If you’ve never been to Kalyn’s Kitchen website, you’ve missed out on some really great South Beach recipes.  I’ve been a fan for years, and last week when I saw her recipe for Slow Cooker Beef & Refried Bean Chili, I knew I had to try it.  The problem was I didn’t have all the ingredients, and I’m not a fan of cumin or mexican oregano, so I adapted hers, and it came out amazingly well.  A different take on tomato based chili, this one is a keeper.  So thanks for the idea Kalyn.  I’ll link to your original version at the end of the post.

I only used 1/3 pound of ground sirloin, yes that’s right, just 1/3 pound, and it was enough, but of course you can add more meat if you want.  I also didn’t add the lime juice, but I did squeeze a fresh lime on my portion, I actually prefer it without the lime.

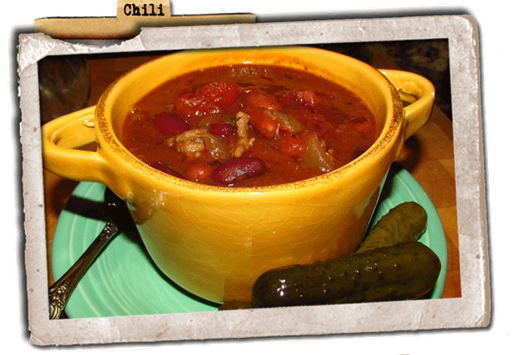
And yes, those are pickles, I’ve eaten pickles with chili since childhood, no peanut butter sandwich for this old girl, just give me some pickles. ;o)

Ingredients:

1/3 lb. ground sirloin
1 large onion, diced
3-4 large cloves of crushed garlic
1 teaspoon salt
1 teaspoon pepper
1/2 teaspoon red pepper flakes
1-2 Tablespoons of chili powder
1 can of Trader Joe’s refried black beans with jalapenos
1 can of light red kidney beans, drained
1 can of dark red kidney beans, drained
1/2 box (2 cups) beef broth
1/2 jar (1.5 cups) salsa
1 can diced tomatoes (I think next time I’ll use Rotel and kick it up another notch)

Brown ground sirloin and onions, stirring in garlic at last minute.  Drain and add to rest of ingredients, simmer in covered pot for 30-45 minutes, or you could put this in a slow cooker on low for 3-4 hours.

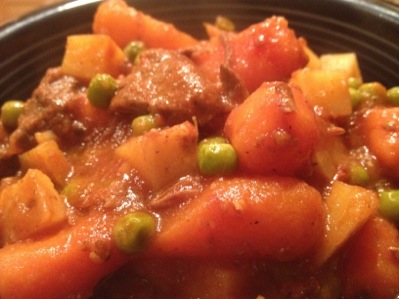
It was thick, spicy and delicious.  I always make tomato based chili, so this beef broth based one was really different.  I loved the refried beans to thicken it, it was just a super recipe.  Be sure and compare mine to Kalyn’s, hers looks wonderful.   Oh, so GOOD!  I’ll be making this healthy chili again and again…

~ jan

Adapted from a recipe from Kalyn’s Kitchen

Barefoot Contessa, Ina Garten's Wonderful Lemon Bars

by 👩‍🍳 Cooking With a Southern Vibe in Music City USA 👩‍🍳, February 04, 2012

Insanely good, decadently delicious, these are seriously the best lemon bars I’ve ever eaten. If I could give these bars twenty stars, I would! I made these last week for my daughter-in-law, who loves anything lemon. She adored them, my girlfriends visited, they adored them, we were all moaning with every bite. Not for the faint of heart, these lemon bars are intensey lemon flavored. They actually tasted like a lemon meringue pie without the meringue, they were so custardy inside.  Easy to make, too, my personal tweaks at the end of the recipe.  I will never look further than this for a lemon bar recipe, these are perfection. Thank you Ina Garten, what a National Treasure you are.


Ingredients


For the crust:
  • 1/2 pound unsalted butter, at room temperature
  • 1/2 cup granulated sugar
  • 2 cups flour
  • 1/8 teaspoon kosher salt
For the filling:
Directions

Preheat the oven to 350 degrees F.

For the crust, cream the butter and sugar until light in the bowl of an electric mixer fitted with the paddle attachment. Combine the flour and salt and, with the mixer on low, add to the butter until just mixed. Dump the dough onto a well-floured board and gather into a ball. Flatten the dough with floured hands and press it into a 9 by 13 by 2-inch baking sheet, building up a 1/2-inch edge on all sides. Chill.

Bake the crust for 15 to 20 minutes, until very lightly browned. Let cool on a wire rack. Leave the oven on.

For the filling, whisk together the eggs, sugar, lemon zest, lemon juice, and flour. Pour over the crustand bake for 30 to 35 minutes, until the filling is set. Let cool to room temperature.

Cut into triangles and dust with confectioners' sugar.

Source: FoodNetwork

And now for my tweaks -

iSight-2012-02-4-13-58.png

I made a saddle of parchment paper (I sprayed the parchment with Pam just to be on the safe side) and put it in my 9x13 pan before patting in the crust. Putting a bit of additional flour on your hands really helps press them into the pan easily.

After I baked the lemon bars for the minimum time (just until they slightly jiggled but not brown, the tops were pale, with just a bit of browning around the edges) I put them in the refrigerator overnight. I didn’t cut them, I didn’t dust them with confectioner’s sugar, I just cooled them and put them in the fridge.

The next morning I lifted the edges of the parchment paper, they came out with just a little bit of a tug, I put them on a cutting board, and I put another cutting board on top and flipped them, then it was simple to peel off the parchment paper. It didn’t stick at all, thanks to the Pam. I then flipped them again so they were upright, cut them into large squares, took the cutting board, put it over the sink, used a strainer and dusted the squares heavily with confectioner’s sugar. I used a lot of powdered sugar.

I read all of Ina’s reviews before I made these, and decided to make her original recipe. There was a bit of confusion about the size of the pan, in the following video she says 9x12, but the website says 9x13, I used 9x13 and they were fine. But since I like all things thick, I might consider just the next size smaller pan the next time I make these.  But then again, these were pretty darned perfect...

A few of the reviewers complained that the filling tasted floury. I tasted one corner when they were warm, and I could detect a faint flour taste, but the secret lies with overnight chilling. This allows the flavors to marry, and trust me, you don’t taste flour, you taste lemon! Utterly delightful, yummy, fresh lemon. I think they are best cold, too. I learned from my elderly neighbor, who loves cold cake and bars, that things straight from the fridge do have a delightfully fresh, cool taste.

The bar in this picture was the last one, and it was a couple of days old by the time I photographed it, so I just gave it a fresh dusting of confectioner’s sugar.

I’ve made lemon bars many times, but never with results like this. I think in the past I always dusted with the sugar too soon and it soaked into the bars, and I never refrigerated them. But, oh what a difference a day in the refrigerator makes...

Give these bars a try the next time you want a WOW Dessert! OH WOW, OH WOW, OH WOW!!!!!!!!!


Here’s Ina’s original video, watch this and it will make everything oh so simple.

bonappetit-2012-02-4-13-58.png


Bakery Style Brownies

by 👩‍🍳 Cooking With a Southern Vibe in Music City USA 👩‍🍳, February 04, 2012

2

I have a technique for you this morning.  I’m a fan of thick brownies, really thick ones like you get at the specialty bakery shoppes.  I don’t like thin brownies spread out in a 9x13 pan, I want them fat.  I used to bake in a 9x9 pan, sometimes in an 8x8 pan, and I got pretty good results, but I found the best way to bake them is in a 9x5 loaf pan.  They take longer to cook, but the results are worth it, thick, dense brownies.  I do the same thing with our old family favorite, Rice Krispie Treats.  I’ve bought them at Starbucks, they taste pretty much like the ones I make, but theirs are very thick.  So I made a batch in a loaf pan, then I turn them on a cutting board and slice them.  Voila, thick Rice Krispie Treats, and a lot less expensive than the ones at the Bucks.

Give this technique a try, I think you will be impressed with the results.

~ jan

BTW, the brownie you are looking at is a low fat, lower calorie version.  Just take a brownie mix, stir a can of pumpkin into it, and an egg.  No water, no oil, just those three ingredients.  The result is rich, ooey gooey low-cal brownies without the fat.  Yes, you can see the specks of pumpkin in my picture, but you don’t taste it, pinky swear you don’t, it just tastes like chocolate.  They aren’t iced either, the tops get gooey if you cover them and let them set overnite.

You can make the same recipe using a cake mix, just use pumpkin and any flavor of cake mix, I like spice a lot, I don’t even use an egg, some people do,  I just mix the pumpkin with the cake mix.  You may think it’s too dry, just keep mixing, it will turn to batter. Here’s a link to how it’s made with lots of reviews.  It’s a good thing ;o)

And back to those Rice Krispie Treats, I was on another blogger’s site today, Krissy’s Creations and she made Brown Butter Vanilla Rice Krispie treats.  I think my family would love them, here’s her link if they sound as good to you as they do to me…

Awesome granola bars, and SO easy….

by 👩‍🍳 Cooking With a Southern Vibe in Music City USA 👩‍🍳, February 04, 2012

gr

I made these granola bars a few days ago, and it literally took me 5 minutes.  Using condensed milk really simplifies this recipe and the results are excellent.

I omitted the butter, and instead of putting them in a pan, I patted them out into a rectangle on my SiloPat baking sheet, baked them for 20 minutes, and they turned out perfect.

Ingredients

    3 heaping cups quick oats old fashioned oats
    1 (14 ounce) can sweetened condensed milk
   2 tablespoons butter, melted
    1 cup flaked coconut
    1 cup sliced almonds
    1 cup miniature semisweet chocolate chips
    1/2 cup sweetened dried cranberries (I used raisins instead)

Directions

    Preheat oven to 350 degrees F (175 degrees C). Grease a 9x13 inch pan.
    In a large bowl, mix together the oats, sweetened condensed milk, butter, coconut, almonds, chocolate chips and cranberries with your hands until well blended. Press flat into the prepared pan.
    Bake for 20 to 25 minutes in the preheated oven, depending on how crunchy you want them. Lightly browned just around the edges will give you moist, chewy bars. Let cool for 5 minutes, cut into squares then let cool completely before serving.

Adapted from a recipe by Allrecipes.com

The BEST ever Teriyaki Marinade

by 👩‍🍳 Cooking With a Southern Vibe in Music City USA 👩‍🍳, February 03, 2012

photo-2-2012-02-3-16-26.JPG

This stuff is nectar of the gods! I used this marinade for chicken, and pork, you are looking at the pork chops in the picture, I used my FoodSaver to pull a vacuum on this, so that I didn’t have to marinade for hours.

I tweak the recipe a bit, using Splenda instead of sugar, and I increase the garlic powder and add onion powder. Sometimes I substitute pineapple juice for water, it’s a very forgiving recipe.

Ingredients

1 cup soy sauce

1 cup water (can substitute pineapple juice)

3/4 cup white sugar (I use 3/4 cup granular Splenda

1/4 cup Worcestershire sauce

3 tablespoons distilled white vinegar

3 tablespoons vegetable oil

1/3 cup dried onion flakes (I use 2 teaspoons onion powder)

2 teaspoons garlic powder (I increase this to a tablespoon)

1 teaspoon grated fresh ginger (I omit the ginger, I’m not a fan.

Mix all together, stores well in the fridge. So simple, and so good.

bonappetitsmall_thumb255B2255D-2012-01-24-17-54-2012-02-3-16-26.png

The World's Best Beef Stew

by 👩‍🍳 Cooking With a Southern Vibe in Music City USA 👩‍🍳, January 30, 2012

IMG_0869-2012-01-30-16-40.jpg

This stew is so good and so hearty, it’s simple comfort food at it’s best. I’ve made this same recipe for more years than I care to remember, and it always turns out perfectly.

2 lbs. stew meat

1 large onion, diced

1 large can crushed tomatoes

1 box beef broth

16 oz. bag of baby carrots, cut in half on the diagonal

4-5 large cubed potatoes, preferably yukon gold

1 bag frozen peas

salt and pepper

optional: a bottle of red wine instead of the beef broth (cabernet sauvignon works well)

Put the stew meat, onion, crushed tomatoes, and beef broth in a large oven proof casserole, salt and pepper to taste. You can brown the beef if you like, I usually don’t. Bake, covered, in a preheated 350° oven for two and a half hours.

Put on top of stove, add carrots and simmer fifteen minutes. Then add cubed potatoes and simmer an additional 20-30 minutes, checking for doneness so they don’t get mushy. At the end of cooking time, pour in the bag of peas, turn off the heat, taste to correct seasonings and sit aside. So easy to make and better the next day.

Optional: We like stew made with red wine, so I sometimes substitute the wine for the beef broth.

Note: When you take the stew out of the oven, if you need more liquid, add another cup or so of beef broth before you add the carrots. Mine is usually thick enough that I don’t need to add a thickening agent, but if you want your liquid thicker, after the veggies are cooked, mix up a slurry of 1/4 cup cornstarch in 1/2 cup water, and add it until you get the consistency you like.

Pillsbury Bake Off Winners Chili Dog Boats Appetizers

by 👩‍🍳 Cooking With a Southern Vibe in Music City USA 👩‍🍳, January 25, 2012

ed7394df-f572-4188-80a1-ee54a78ac383-2012-01-25-08-53.jpg

It’s that time of year again, and we’re all looking for Super Bowl Party appetizers. This winning recipe for Chili Dogs is easy to make and extremely guy friendly.

INGREDIENTS:

1 can (12 oz) Pillsbury® Grands!® Jr. Golden Layers® refrigerated biscuits

10 cocktail-size hot dogs

1/3 cup chili without beans

1/4 cup finely chopped onion (1/2 medium)

1/4 cup shredded Cheddar cheese (1 oz)

1 egg

1 tablespoon prepared yellow mustard

DIRECTIONS:

  • Heat oven to 400°F. Separate dough into 10 biscuits; press or roll each into 4-inch round. Place hot dog in center of each biscuit round. Top each with about 1 teaspoon each of chili, onion and cheese.
  • Bring sides of dough up to center, forming half circles that stand up. Brush edges of dough with water; pinch edges tightly to seal (as dough bakes, edges will open forming a boat shape). Place on ungreased cookie sheet.
  • In small bowl with fork, beat egg; stir in mustard. Brush mixture over top and sides of each filled biscuit.
  • Bake 9 to 13 minutes or until light golden brown. Remove from cookie sheet; serve warm or cool.

Picture and Recipe Source: Pillsbury

© Jan CAN Cook · THEME BY WATDESIGNEXPRESS